How to use iCloud to expand and optimize storage

Using iCloud offers a number of benefits for iPhone and iPad users. iCloud can securely store your photos, videos, documents, music, apps, and more. It allows you to easily share photos, videos and more with friends and family. It can backup your device’s data to help if your’s is every lost or stolen. Finally, you can even use iCloud to help you find your device if you lose it. Even if it is lost between the cushions in our couch!
This recipe provides the details about how to take advantage of iCloud.
What is iCloud?
iCloud is the Apple storage service that you “rent” in the “cloud” in order to store pictures, videos, backup files or other documents. The “cloud” is comprised of Apple storage computers that are accessed from the Internet. Google, Microsoft, Amazon, and other companies provide similar services. However, as an Apple service, you have confidence in the idea that the approach is safe, private and easy to setup and easy to use.
When you start using iCloud, Apple provides you with 5GB of storage at no charge. However, to take advantage of more capabilities, an upgrade to 50GB costs only $1 per month and provides more storage and convenience. This is a Senior Tech Club recommendation. There may be other more affordable approaches to getting the same results at the cost of complication and use of multiple tools.
There are three primary iCloud functions that are recommended for the Senior Tech Club members:
- Find my Phone – iCloud function that provides maps and tools to help your find a lost iPhone or iPad. There is even a tool to help if your device gets lost between the cushions of your couch even if your phone is in silent/vibrate mode.
- iCloud Backup. You should have a backup of the information that is stored on your iPad. Over time, it will grow to include important contacts, messages, books and pictures that you will not want to ever lose. It is also important to perform a backup before upgrading your phone’s software.
- Expand and optimize storage for Pictures and Videos. Pictures and videos can be automatically copied from your iPad to iCloud storage.
This recipe will review all three functions.
Setup your iCloud
Your first step in setting up iCloud is to sign in to iCloud from your iPhone or iPad. iCloud uses your Apple ID & password to set up, access and configure iCloud functions. The set up of iCloud likely occurred during the setup of your phone.
If your iPad has a recent version of the IOS software, you sign in to iCloud and other services like the App Store from a single place.
- Go to Settings.
- Tap [Your Name] to sign in to your [device].
- Enter your Apple ID and password if requested.
- Tap iCloud
If you have an older iPad and IOS combination, you will sign into iCloud as a separate login. Follow these steps to sign in to iCloud separately.
- Go to Settings
- Tap iCloud.
- Enter your Apple ID and password.
Your will then be presented with dozens of setup options for your connection to iCloud. Here is the setup screen.
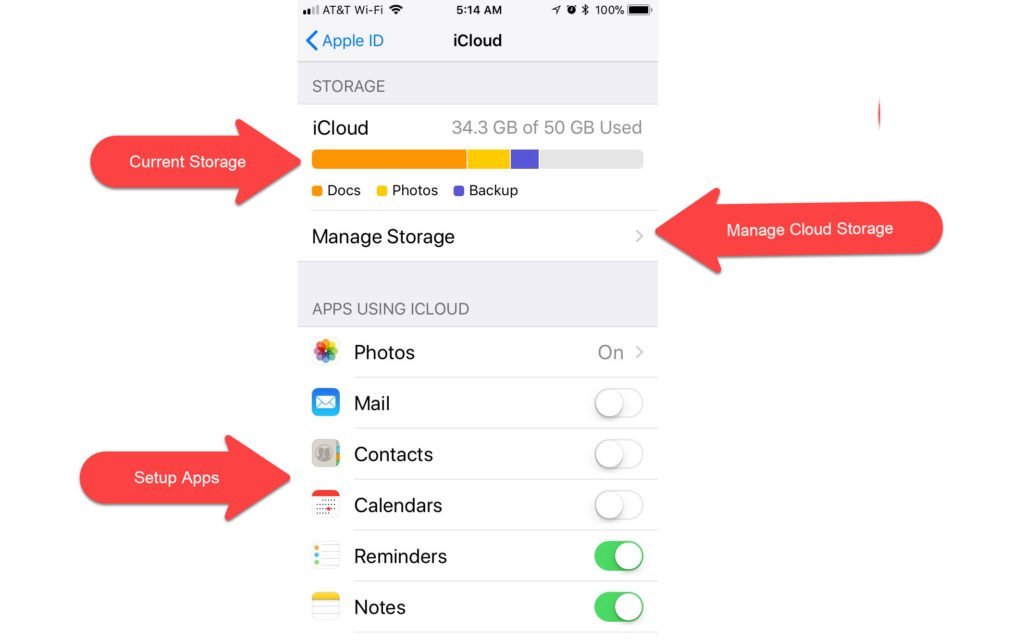
Current Storage – As you start to use iCloud storage, this is a hand graph that show how your storage is being used.
Manage Storage – See the Apps who’s data you are storage and use this function to delete data that you no longer wish to store on iCloud.
Setup Apps – On the screen you will see a list of apps that are current installed on your device. In this setup, you are essentially identifying which App’s data you wish to also store on the cloud. We believe that if you enable backup, there are only a few apps that you will enable (Green means on) A good example would be Contacts. You might want to have your Contacts available on other devices. But in the case above, I use Contacts from my Google account so they are already available on the Gmail site. If you have questions about this, enter a comment or note below for feedback on specific apps.
In this recipe we will walk through the setup of three essential functions, Find your iPhone/iPad, Backup and Photos.
 Smart Tip: Three Essential Functions
Although everyone’s use of their iPhones is different, we believe that there are three functions as stated earlier that are most relevant for Senior Tech Club members Find your iPhone/iPad, Backup and Photos. Your needs could be different if you are active users of other Apps.
How to Find your iPhone/iPad?
The Find your iPad provides maps and tools that will help you find a lost phone whether it is lost in your house or left at some other location. There are two requirements to use this function:
- Find your iPad function is turned on and configured. Your options are more limited if you lose your iPad and remember at that point that you never turned the function on.
- You have access to another device or laptop or desk machine where you can access www.icloud.com.
Setup Find your iPhone or iPad
- Access iCloud on your iPad
- IOS 10.3 (current) or later tap Settings > [your name] > iCloud.
- IOS 10.2 or earlier, tap Settings > iCloud.
- Scroll to the bottom and tap Find My iPhone/iPad.
- Slide to turn on Find My iPad/iPad and Send Last Location. (Green means on) Send Last Location will send Apple the last location as a battery dies. Critical if some time passes before you recognize that your iPad is missing.

Using Find your iPhone/iPad Functions
There are options when you need to use the Find Your Iphone function. You can either use the iCloud.com web site or use your or another persons iPhone or iPad. From a web browser, access www.icloud.com/find. Optionally you can also use the Find iPad app on another iPad or iPad. Or your can use another person’s iPad and log on with your Apple ID.
- Log on with your Apple ID
- Your device locations are displayed on a map.
- If you have more than one Apple device, select the desired device from the pull down at the top of the screen.
- After picking the device, you can perform the following:
- Locate your device on a map
- Play a sound on your device to help you find it. Useful when you have lost your phone in your house, for example, it dropped between the cushions on your couch.
- Remotely erase all of your personal information from the device
- Use Lost Mode to lock and track your device and display a message on the phone

iPad screen showing custom message using Find your iPhone app.
How to backup your iPhone/iPad with iCloud
Another function available with iCloud is the ability to backup your iPhone or iPad. The standard 5GB of storage that you receive for free may not be adequate to perform a backup if you use your device’s camera, read books and listen to music. The plan that extends your iCloud storage to 50GB for $1 per month is easy insurance and will also optimize your iPad photo storage.
A manual and free alternative is to backup your iPad by connecting to your computer with the iTunes app and performing a manual backup.
Automatic Backup
The automatic backup feature can automatically backup your device daily. This is a solid and care free approach to preserving your iPad’s data.
- Access iCloud on your iPhone or iPad
- IOS 10.3 (current) or later tap Settings > [your name] > iCloud.
- IIOS 10.2 or earlier, tap Settings > iCloud.
- Tap iCloud Backup. If you’re using iOS 10.2 or earlier, tap Backup. Make sure that iCloud Backup is turned on. (Green is on)
- Your iPad will now perform a daily backup when:
- You are charging your phone
- and you are connected to WiFi
- and your screen is locked
- and you have adequate iCloud storage.

Manual Backup – Backup Now
If you have setup backup as indicated above, manual actions are not necessary. A manual backup might be appropriate if you are planning to update your IOS software or if you are upgrading your phone and you want to control the timing of the backup.
- Make sure you are connected to WiFi.
- Access the Backup screen as indicated above.
- Tap Back Up Now.
- See status information and the amount of time remaining on the screen during the backup.
Note: If you are syncing your photo library to iCloud, the backup process does NOT back up your photos. We recommend using the iCloud Photo library to back up your photos and let backup handle the rest of your backup needs.
Smart Tip: Automatic Backups are Best
It is very comforting to know that when you plug your device in at night, that your backup occurs automatically. The setup of automatic backup is highly recommended. You will not lose important contacts or other data if your device is lost or stolen.
How to use the iCloud Photo Library?
Pictures and video use a lot of storage space on your iPad or iPad. And running out of storage will bring photography to a halt. The iCloud Photo Library will allow you to store all your photos and video online, freeing valuable storage space on your device.
When you turn on iCloud Photo Library and are on Wi-Fi, your iPad or iPhone will automatically and copy your pictures and video from your device to your iCloud account. From iCloud, your photos can be accessed from your other Apple devices or from the web.
Your iPad also offers an option called Optimize Storage: When enabled, your iPad or iPhone will locally store only the latest images and video you’ve taken; the others live up in iCloud, ready to be downloaded when you need them. Importantly, not taking up your iPad’s storage.
The settings for setting up the iCloud Photo Library can be accessed with the following actions:
- Access Settings
- Scroll down and tap Photos and Camera
- Tap iCloud Photo Library on (Green is on)
- Tap Optimize iPad Storage.

Be patient. It will take a while for these changes to take place.
You can access your online iCloud Photo Library by logging onto iCloud.com with any web browser using your Apple ID. From the web iCloud Photo function you can download, print or share your photos.
Upgrade your Storage Plan
After you have completed your setup, you may alerted that the 5 GB free storage plan will not provide enough storage to support both Backups and the Photo Library. You can update your storage plan with the following steps:
- Access iCloud on your iPad or iPhone
- IOS 10.3 (current) or later tap Settings > [your name] > iCloud.
- IOS 10.2 or earlier, tap Settings > iCloud.
- iCloud under Storage
- Tap Change Storage Plan the your plan options will display

Plan payments will be made against the credit card associated with your Apple ID/App Store account. If this need to be updated, find this function with:
- IOS 10.3 (current) or later tap Settings > [your name] > Payment & Shipping
- IOS 10.2 or earlier, tap Settings > iCloud, Apple ID, login, Payment
Smart Tip: Upgrade is a Great Bargain
Apple current offers 50GB of iCloud storage for about $1 per month. That makes the ability to optimize photo storage and backup your iPhone’s data a bargain and is highly recommended.
Check for Understanding
Use the following questions to determine if you need to read or study this recipe. You might already have an understanding of this topic. Following your study, answer the same questions to help you check your understanding of the skills taught in this lesson.
- Question 1
- Question 2
- Question 3
Additional Information
The Senior Tech Club recommends the following additional resources for members that wish to pursue additional and/or advanced information on this recipe:
iPhone User Guide – Conference Calls
Lifewire.com – How to Make Free Conference Calls on iPhone
0 Comments